Set up group offers and enrollments
Create offers (packages or subscriptions) for your groups and manage student enrollments.
Set up group offers and enrollments
Offers define how students pay for group classes. This guide explains how to create offers and manage enrollments.
What is an offer?
An offer is a billing plan for your group. It defines:
- Price – How much students pay
- Type – Package (fixed sessions) or subscription (ongoing)
- Sessions – How many classes are included
All prices are displayed in your preferred currency (set in your profile).
Note: The system is designed to support multiple offers per group, but in the current version you configure one active offer when you create the group.
Create an offer
Offers are created when you create the group. To create a group with an offer:
- Go to Students from the top navigation
- Scroll down to the My Groups section
- Click Create New Group
- Fill in the group details and offer information:
- Group name – A descriptive name (the offer uses this name)
- Description (optional) – Details about the group
- Plan type – Package or Subscription
- Pricing fields – Package price, price per class, number of classes
- Click Create

Note: Offers are configured when creating the group. To change pricing, you would need to create a new group with different settings and move students over.
Package offer settings
For packages, specify:
- Total sessions – How many classes the package includes
- Sessions are deducted when students attend and you mark attendance
Subscription offer settings
For subscriptions:
- Each payment adds credits (sessions) based on the per-class price
- Attendance deducts sessions, same as packages
- There’s no fixed end date – the enrollment continues with recurring payments
View existing offers
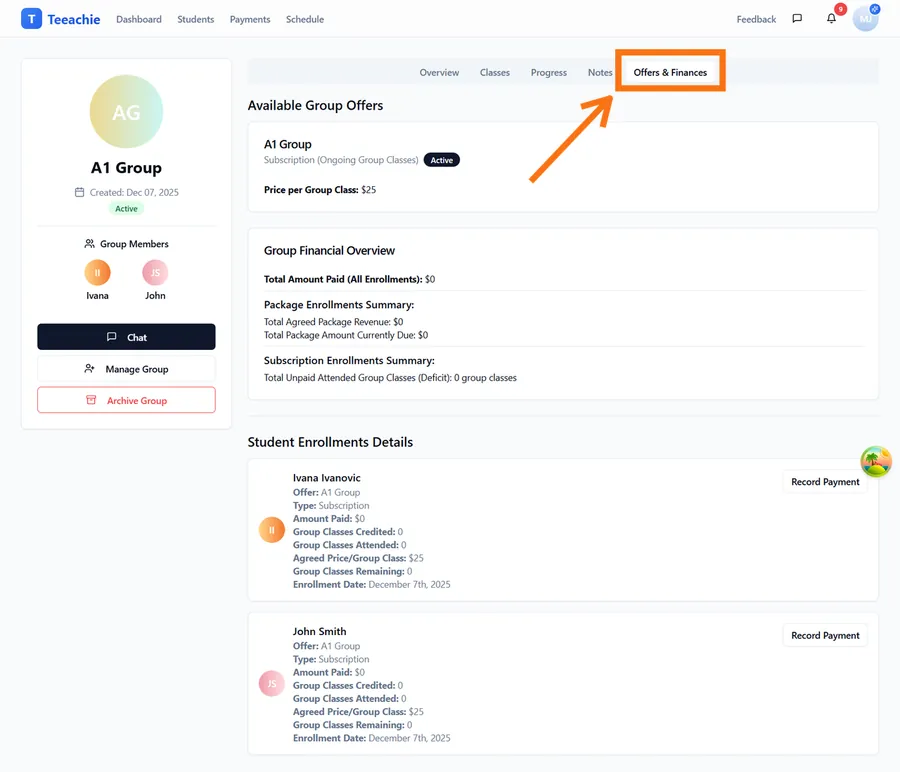
In the group profile, the Offers & Finances tab shows:
- Offer name and plan type
- Active/inactive status badge
- Pricing details
Enroll students
When a student is ready to join an offer:
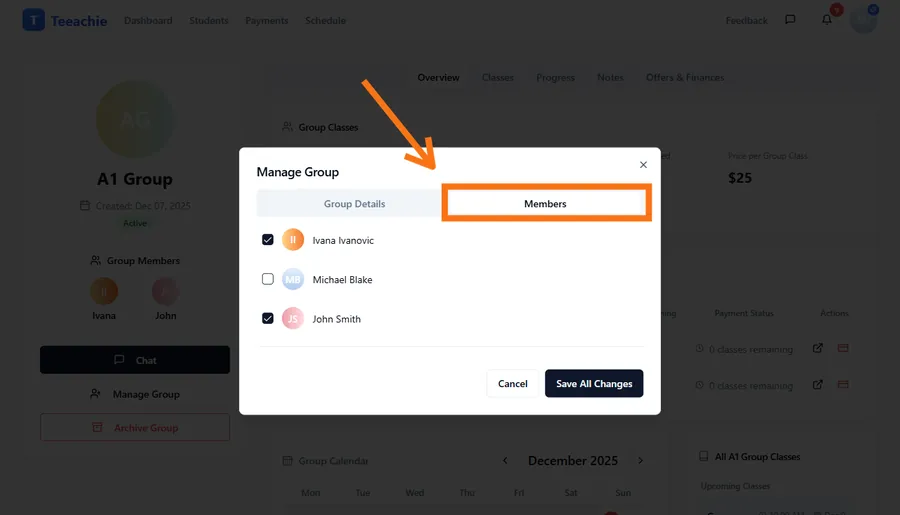
- Add the student to the group (group profile → Manage Group).
- If the group has only one offer, it is auto-selected. If there are multiple offers (future capability), choose the offer.
- An enrollment record is created in Pending initial payment.
- Record payment to move the enrollment to Active.
Enrollment statuses
| Status | Meaning |
|---|---|
| Active | Currently enrolled and can attend classes |
| Pending initial payment | Enrolled, awaiting first payment |
| Awaiting payment | Active but needs additional payment |
| Pending invitation | Student hasn’t accepted invitation yet |
| Completed | Package sessions used up |
| Cancelled | No longer enrolled |
| Group archived | The group itself was archived |
Status transitions
- New enrollment → Pending initial payment (until first payment recorded)
- Payment recorded → Active
- Package depleted → Completed
- Student removed or leaves → Cancelled
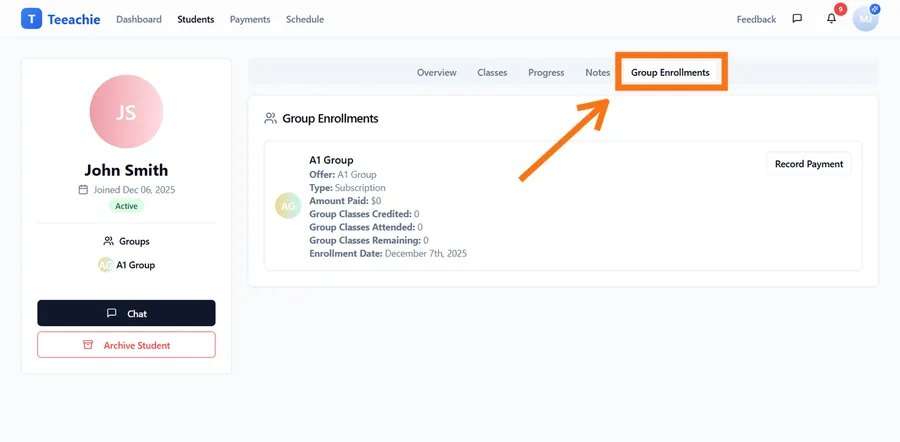
Track enrollment details
Each enrollment shows:
- Offer name – Which plan they’re on
- Status – Current enrollment status
- Sessions remaining – For packages
- Payment history – Linked payments
Changing offers
In the current version, there isn’t an in-app way to edit or archive offers after creation. If you need different pricing:
- Create a new group with the desired offer settings
- Move students to the new group
- Archive the old group
Existing enrollments continue with their original terms.
Best practices
Start with one offer
Keep it simple initially. Add more offers as you understand what students prefer.
Name offers clearly
“10-Session Beginner Package” is clearer than “Package A”
Set appropriate prices
Consider the per-session value and compare to your individual rates.
Process payments promptly
Move enrollments from Pending to Active by recording payments.
What’s next?
- Schedule group classes – Book sessions for your group
- Record group payments – Process enrollment payments
- Track attendance – Mark who attended each class
Need help?
Questions about offers or enrollments? Contact support and we’ll assist you.